

RADIO, SET UP, VOLUME CONTROL (PA710S) (If Installed)
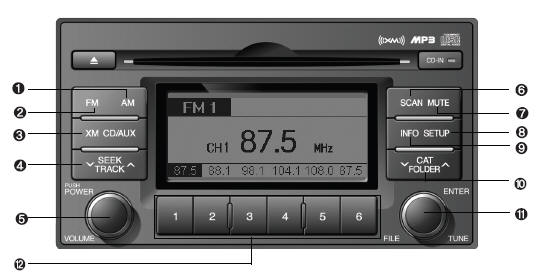
1. AM Selection Button
2. FM Selection Button
3. XM Selection Button
4. Automatic Channel Selection Button
5. Power ON/OFF Button & Volume Control Button
6. SCAN Button
7. MUTE Button
8. SETUP Button
9. Information Display Button
10. CAT(FOLDER) Button
11. TUNE/ENTER Button
12. Preset Button
1. AM Selection Button
Pressing the [AM] button selects the AM band. AM Mode is displayed on the LCD. 2. FM Selection Button Turns to FM mode and toggles FM1 and FM2 when the button is pressed each time.
3. XM Selection Button
Turns to FM mode, and toggles in the order of XM1➟XM2➟XM3➟···➟XM1··· when the button is pressed time.
4. Automatic Channel Selection Button
o When the [SEEK ] button is pressed, it reduces the band frequency by 200khz to automatically select channel. Stops at the previous frequency if no channel is found.
o When the [SEEK ] button is pressed, it increases the band frequency by 50khz to automatically select channel. Stops at the previous frequency if no channel is found.
5. Power ON/OFF & Volume Control Button
Turns on/off the set when the IGNITION SWITCH is on ACC or ON. If the button is turned to the right, it increases the volume and left, decreases the volume.
6. SCAN Button
If this button is pressed, the frequencies will become increased and receive the corresponding broadcasts.
This function will play the frequencies for 10 seconds each and find other broadcasts as the frequency increases.
Press the button again when desiring to continue listening to the currently playing broadcast.
7. MUTE Button
Press to temporarily cut off the Sound.
8. SETUP Button
Press this button to turn to the SCROLL, XM option, RETURN and P.BASS adjustment mode.
If no action is taken for 5 seconds after pressing the button, it will return to the play mode.(After entering SETUP mode, move between items using the left, right and PUSH functions of the TUNE button.) The setup Items changes from SCROLL <->XM<->RETURN<->P.BASS.
9.Infomation Display Button
Informatiom is Display Function opetion (Information is displayed each time (the) ey is pressed)
Pressing the Title -> Artist -> Album Category -> Channel -> Title-KEY for 3 seconds will display the corresponding text then become restored.
Text Scroll operation
After pressing (the) Key, if the text to be displayed is longer than the LCD text line, then rotating the TUNE Knob will operate the page up function displaying 8 characters for 3 seconds each-displayes the maximum lines of text supported by XM.
10. CAT(FOLDER) Button
Moves [CAT ] Button when Category Up search operation.
o Category is moved Up fronm the category currently being received and Category name becomes displayed.
o If the Enter Key is not pressed within 5 seconds, then the previous mode will be restored.
o If the Key is Pressed While in the last Category, then the first category will become displayed and operation will ne repeated.
o Corresponding category can be selected by pressing ENTER. Moves [CAT ] Button when Category Down search operaton.
o Category is moved Down from the cat-egry currently being receiced and Category Name becomes displayed.
o If the Enter Key is nit pressed within 5 seconds, then the previous mode will be restored.
o If the [CAT ] Key is pressed while in the first Category, then the last category will become displayed and operation will be repeated.
o Corresponding category can be seletcted by pressing ENTER.
11. TUNE/ENTER Button
Turn this button clockwise one notch to increase frequency from current frequency. Turn this button counterclockwise by one notch to decrease frequency from current frequency.
The frequency cahnges by 0.2Mhz in FM MODE and 9Khz in AM MODE. Press this button while holding SETUP button to activate / inactivate the item to. Select SETUP item using left and right function of the Tune button.
12. PRESET Button
Push [1]~[6] buttons less than 0.8 second to play the channel saved in each button. Push PRESET button for 0.8 second or longer to save current channel to the respective button with a beep.
CAUTION:
o Do not place beverages close to the audio system. The playback mechanism may be damaged if you spill them.
o Do not strike or allow anything to impact the audio system, damage to the system mechanisms could occur.
See also:
Manual heating and air conditioning
The heating and cooling system can be controlled manually by pressing buttons
or turning knob(s) other than the AUTO button. In this case, the system works sequentially
according to the order of b ...
Navigation system (if equipped)
The navigation system ascertains the present position of your vehicle by using
information from satellites and guides you to the place you assign as the destination.
Detailed information for the na ...
Consumer information
This consumer information has been prepared
in accordance with regulations issued by the
National Highway Traffic Safety Administration
of the U.S. Department of Transportation. It
provides the pu ...