Day/night inside rearview mirror

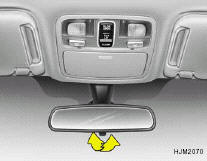
Manual Type
Your Hyundai is equipped with a day/night inside rearview mirror. The "night" position is selected by flipping the tab at the bottom of the mirror toward you. In the "night" position, the glare of headlights of cars behind you is reduced.

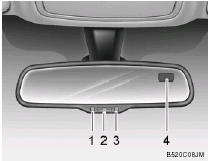
AUTOMATIC DIMMING REAR VIEW MIRROR WITH COMPASS (If installed)
1. Status Indicator LED
2. Feature Control Button
3. Rear Light Sensor
4. Display Window
Automatic dimming rear view mirror controls automatically the glare of headlights of the car behind you when it turned on by pressing and holding the button for more than 3 but less than 6 seconds.
It is turned off by pressing and holding the button for same time once more.
1. To operate Compass feature
Press and release the button, then the vehicle's directional heading will be displayed. Pressing and releasing the button again will turn off the display.
Heading display.
- E : East.
- W : West.
- S : South.
- N : North.
ex) NE : North East.
2. Calibration procedure
Press and hold the button for more than 9 but less than 12 seconds. When the compass memory is cleared a "C" will appear in the display.
- Driving the vehicle in a circle at less than 5mph 2 times or until the compass heading appears.
- Driving in a circle in right-handed direction and opposite direction are possible, and if the calibration is completed, the compass heading will appear.
- Keep driving in a circle until a compass heading appears.
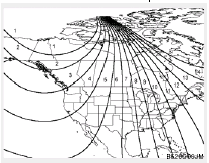
3. Setting the compass zone
1. Find your current location and variance zone number on the zone map.

2. Press and hold the button for more than 6 but less than 9 seconds. The current zone number will appear in the display.
3. Press the button until the new zone number appears in the display. After you stop pressing the button in, the display will show a compass direction within a few seconds.
4. Changing Mirror Angle setting (If Installed):
Due to mirror positions being angled towards the driver, the compass mirror can also compensate for drivers seated on the Left Hand side of the vehicle (steering wheel on the LH side of the vehicle) or Right Hand side of the vehicle (steering wheel on the RH side of the vehicle).
To adjust the Left Hand, УLФ or Right Hand, УRФ,
setting:
1. Press and hold the button for more than 12
seconds.
2. Release then press the button to toggle between УLФ and УRФ.
NOTE:
This procedure also causes the compass to
be de-calibrated.
3. To re-calibrate the compass, drive the vehicle in 2 complete circles at less than 8km/ h (5mph).
CAUTION:
1. Do not install the ski rack, antenna, etc.
which are attached to the vehicle by means of a magnet. They affect the operation of the compass.
2. If the compass deviates from the correct indication soon after repeated adjustment, have the compass checked at an authorized dealer.
3. The compass may not indicate the correct compass point in tunnels or while driving up or down a steep hill.
(The compass returns to the correct
compass point when the vehicle moves
to an area where the geomagnetism is
stabilized.)
4. When cleaning the mirror, use a paper
towel or similar material dampened with
glass cleaner. Do not spray glass cleaner
directly on the mirror as that may cause
the liquid cleaner to enter the mirror
housing.
See also:
Opening the trunk with the alarm armed (if equipped)
When the alarm is armed, the alarm will not sound if the trunk lid is opened
with the transmitter (or smart key). Once the trunk is opened and then closed, the
trunk will be locked automatically a ...
To decrease the cruising speed
Follow either of these procedures:
o Push the -/SET switch and hold it. Your vehicle will gradually slow down. Release
the switch at the speed you want to maintain.
o Push the -/SET switch and r ...
ADVANCED STANDARD SAFETY TECHNOLOGIES: PART OF HYUNDAI'S ASSURANCE
COMMITMENT
Hyundai Sonata is built from the ground up with safety in mind, with a hot
stamped ultra-high-strength steel body structure, advanced airbag technology and
Electronic Stability Control (ESC), deli ...


