

Headlight aiming adjustment
Before performing aiming adjustment, make sure of the following.
1. Keep all tires inflated to the correct pressure.
2. Place the vehicle on level ground and press the front bumper & rear bumper down several times.
Place vehicle at a distance of 118 in. (3m) from the test wall.
3. See that the vehicle is unloaded (except for full levels of coolant, engine oil and fuel, and spare tire, jack, and tools). Have the driver or equivalent weight placed in driver's seat.
4. Clean the head light lenses and turn on the headlights (Low beam).
5. Open the hood.
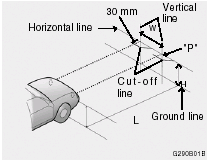
6. Draw a vertical line (through the center of each headlight beam pattern) and a horizontal line (through the center of each headlight beam pattern) on the aiming screen.
And then, draw a parallel line at 0.8 in. (21 mm) under the horizontal line.
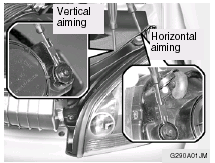
7. Adjust each cut-off line of the low beam to the parallel line with a phillips screwdriver - VERTICAL AIMING.
WARNING:
Never attempt to adjust the horizontal alignment
of your headlights. Horizontal aiming
must be adjusted by an authorized Hyundai
dealer to avoid incorrect alignment that will
reduce the effectiveness of your headlights.
Adjustment After Headlight Assembly Replacement
If the vehicle has had front body repair and the headlight assembly has been replaced, the headlight aiming should be checked using an aiming chart as shown in the illustration. Turn on the headlight switch. (Low Beam Position)
1. Adjust headlights so that main axis of light is parallel to center line of the body and is aligned with point "P" shown in the illustration.
2. Dotted lines in the illustration show the center of headlights.
SPECIFICATION:
"H";
Horizontal center line of headlights from
ground: 35.6 in.(904 mm).
"W";
Distance between each headlight center:
53.4 in.(1,356 mm).
"L";
Distance between the headlights and the
wall that the lights are tested against:
118 in. (3,000 mm).
See also:
Snow Tires
If you equip your car with snow tires, they should be the same size and have
the same load capacity as the original tires. Snow tires should be installed on
all four wheels; otherwise, poor handli ...
Heating and ventilation
There are three controls and two switches for
the heating and cooling system. They are:
1. Air flow control.
2. Fan speed control.
3. Temperature control.
4. Air intake control switch.
5. Air ...
How vehicle audio works
AM and FM radio signals are broadcast from transmitter towers located around
your city. They are intercepted by the radio antenna on your vehicle. This signal
is then received by the radio and s ...