

Audio system
RADIO, SET UP, VOLUME CONTROL (PA 710S) (If installed)
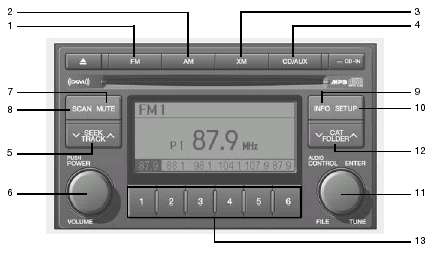
1. FM Selection Button
2. AM Selection Button
3. XM Selection Button
4. CD/AUX Selection Button
5. Automatic Channel Selection Button
6. Power ON/OFF
7. MUTE Button
8. SCAN Button
9. Information Display Button
10. SET UP Button
11. TUNE/ENTER Button
12. CAT(FLDR) Button
13. Preset Button
1. FM Selection Button
Turns to FM mode and toggles FM1 and FM2 when the button is pressed each time.
2. AM Selection Button
Turns to AM mode, and toggles in the order of
AM1 AM2 ···AM1···when the button is
pressed each time.
3. XM Selection Button
Turns to XM mode, and toggles in the order of
XM1XM2XM3···XM1··· when the button
is pressed each time.
4. CD/AUX Selection Button
If there is a cd in the CDP DECK it turns to CD mode, and if a device is connected to AUX then it toggles.
CDAUXCD··· when the button is pressed
each time.(It will not turn to AUX if the auxiliary
device is not connected)
5. Automatic Channel Selection Button
o When the [SEEK  ]button is pressed,
it
reduces the band frequency by 200khz to
automatically select channel. Stops at the
previous frequency if no channel is found.
o When the [SEEK  ]button is pressed, it
increases the band frequency by 50khz to
automatically select channel. Stops at the
previous frequency if no channel is found.
6. Power ON/OFF & Volume Control Button
Turns on/off the set when the IGNITION SWITCH is on ACC or ON. If the button is turned to the right, it increases the volume and left, decreases the volume.
7. MUTE Button
Press to temporarily cut off the Sound.
8. SCAN Button
If this button is pressed, the frequencies will become increased and receive the corresponding broadcasts.
This function will play the frequencies for 5 seconds (XM MODE : 10 seconds) each and find other broadcasts as the frequency increases.
Press the button again when desiring to continue listening to the currently playing broadcast.
9. Information Display Button
Information Display function operation (Information
is displayed each time (the) Key is
pressed) : Pressing the Category Channel
Name Artist NameSong TitleCategory-
KEY for 3 seconds will display the corresponding
text then become restored.
Text Scroll operation
After pressing (the) Key, if the text to be displayed
is longer than the LCD text line, then
rotating the Tune Knob will operate the Page up
function displaying 8 characters for 3 seconds
each - displays the maximum lines of text
supported by XM.
10. SET UP Button
Press this button to turn to the XMoption, SCROLL and adjustment mode.
If no action is taken for 5 seconds after pressing
the button, it will return to the play mode.(After
entering SET UP mode, move between items
using the left, right and PUSH functions of the
TUNE button.)
The set up item changes from AUDIO adjustment,
TEXT SCROLL, XM setup.
11. TUNE/ENTER Button
Turn this button clockwise by one notch
to increase frequency by 0.05Mhz from current frequency.
Turn this button counterclockwise by one notch to decrease frequency by 0.05Mhz from current frequency.
Press this button while holding SET UP button to activate / inactivate the item to.
Select SET UP item using left and right function of the Tune button.
Pressing the changes the BASS, MIDR- ANGE, TREBLE, FADER and BALANCE TUNE mode.
The mode selected is shown on the display.
After selecting each mode, rotate the Audio control knob clockwise or counterclockwise.
o BASS Control.
To increase the BASS, rotate the knob clockwise, while to decrease the BASS, rotate the knob counterclockwise.
o MID-RANGE Control.
To increase the MID-RANGE, rotate the knob clockwise, while to decrease the MID-RANGE, rotate the knob counterclockwise.
o TREBLE Control.
To increase the TREBLE, rotate the knob clockwise, while to decrease the TREBLE, rotate the knob counterclockwise.
o FADER Control.
Turn the control knob clockwise to emph- asize rear speaker sound (front speaker sound will be attenuated). When the control knob is turned counterclockwise, front speaker sound will be emphasized (rear speaker sound will be attenuated).
o BALANCE Control.
Rotate the knob clockwise to emphasize right speaker sound (left speaker sound will be attenuated). When the control knob is turned counter clockwise, left speaker sound will be emphasized (right speaker sound will be attenuated).
12. CAT(FLDR) Button
Moves [CAT ] Button when Category Up
search operation.
o Category is moved Up from the category currently being received and Category Name becomes displayed.
o If the Enter Key is not pressed within 5 seconds, then the previous mode will be restored.
o If the Key is pressed while in the last Category, then the first category will become displayed and operation will be repeated.
o Corresponding category can be selected by pressing ENTER.
Moves [CAT ] Button when Category Down
search operation.
o Category is moved Down from the category currently being received and Category Name becomes displayed.
o If the Enter Key is not pressed within 5 seconds, then the previous mode will be restored.
o If the [CAT ] Key is pressed while in
the
first Category, then the last category will
become displayed and operation will be repeated.
o Corresponding category can be selected by pressing ENTER.
13. Preset Button
Push [1]~[6] buttons less than 0.8 seconds to play the channel saved in each button.
Push pre-set button for 0.8 seconds or longer to save current channel to the respective button with a beep.
CD (PA 710S) (If installed)
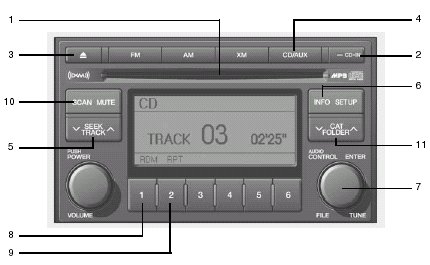
1. CD Loading Slot
2. CD Indicator
3. CD Eject Button
4. CD/AUX Selection Button
5. Automatic Track Selection Button
6. INFO Button
7. TUNE/ENTER Button
8. RANDOM Play Button
9. REPEAT Button
10. SCAN Play Button
11. FOLDER Button
1. CD Loading Slot
Please face printed side upward and gently push in. When the ignition switch is on ACC or ON and power is off, power is automatically turned on if the CD is loaded. This CDP supports both 8cm and 12 cm CDs. But if VCD, Data CD, MP3 CD are loaded, "Er-6" message will appear and CD will be ejected.
2. CD Indicator
When car ignition switch is ACC or ON and if the CD is loaded, this indicator is lighted. If the CD is ejected the light is turned off.
3. CD Eject Button
Push  button to eject the CD during CD
playback. This button is enabled when ignition
switch is off.
4. CD/AUX Selection Butto
If there is a cd in the CDP DECK it turns to CD mode, and if a device is connected to AUX then it toggles.
CDAUXCD··· when the button is pressed
each time.(It will not turn to AUX if the auxiliary
device is not connected)
5. Automatic Track Selection Button
o Push [SEEK ] button for less than
0.8
seconds to play from the beginning of current
song.
o Push [SEEK ] button for less than 0.8
seconds and press again within 1 seconds
to play the previous song.
o Push [SEEK ] button for 0.8 or longer
to
initiate reverse direction high speed sound
search of current song.
o Push [SEEK ] button for less than 0.8
seconds to play the next song.
o Push [SEEK ] button for 0.8 or longer
to
initiate high speed sound search of current
song.
6. INFO Button
Displays the information of the current CD
TRACK in the order of DISC TITLE DISC
ARTISTTRACK TITLE TRACK ARTIST
TOTAL TRACK Play Screen DISC
TITLE···.(not displayed if the information is not
available on the DISC.)
7. TUNE/ENTER Button
Turn this button clockwise to display songs after current song.
Also, turn this button counterclockwise to display songs before current song.
To listen to the displayed song, press the button to skip to the song and play.
Pressing the changes the BASS, MIDR- ANGE, TREBLE, FADER and BALANCE TUNE mode.
The mode selected is shown on the display.
After selecting each mode, rotate the Audio control knob clockwise or counterclockwise.
o BASS Control.
To increase the BASS, rotate the knob clockwise, while to decrease the BASS, rotate the knob counterclockwise.
o MID-RANGE Control.
To increase the MID-RANGE, rotate the knob clockwise, while to decrease the MID-RANGE, rotate the knob counterclockwise.
o TREBLE Control.
To increase the TREBLE, rotate the knob clockwise, while to decrease the TREBLE, rotate the knob counterclockwise.
o FADER Control.
Turn the control knob clockwise to emph- asize rear speaker sound (front speaker sound will be attenuated). When the control knob is turned counterclockwise, front speaker sound will be emphasized (rear speaker sound will be attenuated).
o BALANCE Control.
Rotate the knob clockwise to emphasize right speaker sound (left speaker sound will be attenuated). When the control knob is turned counter clockwise, left speaker sound will be emphasized (right speaker sound will be attenuated).
8. RANDOM Play Button
Turns on/off the randomization of the play list of files in the currently played DISC.
To cancel the mode, press the key once again.
9. REPEAT Button
Repeats current song when the button is pressed for less than 0.8 seconds.
Repeats the entire DISC when the button is pressed for 0.8 seconds or longer.
10. SCAN Play Button
Plays first 10 seconds of each song in the DISC.
To cancel the mode, press the key once again.
11. FOLDER Button
Folder up/down operation.
o Folder is moved up or down from currently playing and folder name becomes displayed.
o Press enter key to play the selected folder.
o If the enter key is not pressed with in 5 seconds, then the previous folder name will be displayed again.
RADIO, SET UP, VOLUME CONTROL (PA 760S) (If installed)
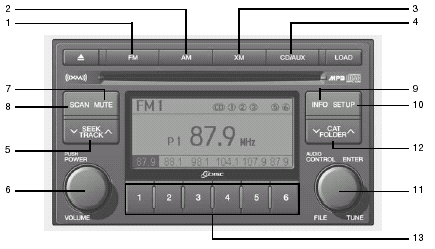
1. FM Selection Button
2. AM Selection Button
3. XM Selection Button
4. CD/AUX Selection Button
5. Automatic Channel Selection Button
6. Power ON/OFF
7. MUTE Button
8. SCAN Button
9. Information Display Button
10. SET UP Button
11. TUNE/ENTER Button
12. CAT(FLDR) Button
13. Preset Button
1. FM Selection Button
Turns to FM mode and toggles FM1 and FM2 when the button is pressed each time.
2. AM Selection Button
Turns to AM mode, and toggles in the order of
AM1AM2···AM1···when the button is
pressed each time.
3. XM Selection Button
Turns to XM mode, and toggles in the order of
XM1XM2XM3···XM1··· when the button
is pressed each time.
4. CD/AUX Selection Button
If there is a cd in the CDP DECK it turns to CD mode, and if a device is connected to AUX then it toggles.
CDAUXCD··· when the button is pressed
each time.(It will not turn to AUX if the auxiliary
device is not connected)
5. Automatic Channel Selection Button
o When the [SEEK ]button is pressed,
it
reduces the band frequency by 200khz to
automatically select channel. Stops at the
previous frequency if no channel is found.
o When the [SEEK ]button is pressed, it
increases the band frequency by 50khz to
automatically select channel. Stops at the
previous frequency if no channel is found.
6. Power ON/OFF & Volume Control Button
Turns on/off the set when the IGNITION SWITCH is on ACC or ON. If the button is turned to the right, it increases the volume and left, decreases the volume.
7. MUTE Button
Press to temporarily cut off the Sound.
8. SCAN Button
If this button is pressed, the frequencies will become increased and receive the corresponding broadcasts.
This function will play the frequencies for 5 seconds (XM MODE : 10 seconds) each and find other broadcasts as the frequency increases.
Press the button again when desiring to continue listening to the currently playing broadcast.
9. Information Display Button
Information Display function operation (Information
is displayed each time (the) Key is
pressed) : Pressing the Category Channel
Name Artist NameSong TitleCategory-
KEY for 3 seconds will display the corresponding
text then become restored.
Text Scroll operation
After pressing (the) Key, if the text to be displayed
is longer than the LCD text line, then
rotating the Tune Knob will operate the Page up
function displaying 8 characters for 3 seconds
each - displays the maximum lines of text
supported by XM.
10. SET UP Button
Press this button to turn to the XMoption, SCROLL and adjustment mode.
If no action is taken for 5 seconds after pressing
the button, it will return to the play mode.(After
entering SET UP mode, move between items
using the left, right and PUSH functions of the
TUNE button.)
The set up item changes from AUDIO adjustment,
TEXT SCROLL, XM setup.
11. TUNE/ENTER Button
Turn this button clockwise by one notch to increase frequency by 0.05Mhz from current frequency.
Turn this button counterclockwise by one notch to decrease frequency by 0.05Mhz from current frequency.
Press this button while holding SET UP button to activate / inactivate the item to.
Select SET UP item using left and right function of the Tune button.
Pressing the changes the BASS, MIDR- ANGE, TREBLE, FADER and BALANCE TUNE mode.
The mode selected is shown on the display.
After selecting each mode, rotate the Audio control knob clockwise or counterclockwise.
o BASS Control.
To increase the BASS, rotate the knob clockwise, while to decrease the BASS, rotate the knob counterclockwise.
o MID-RANGE Control.
To increase the MID-RANGE, rotate the knob clockwise, while to decrease the MID-RANGE, rotate the knob counterclockwise.
o TREBLE Control.
To increase the TREBLE, rotate the knob clockwise, while to decrease the TREBLE, rotate the knob counterclockwise.
o FADER Control.
Turn the control knob clockwise to emph- asize rear speaker sound (front speaker sound will be attenuated). When the control knob is turned counterclockwise, front speaker sound will be emphasized (rear speaker sound will be attenuated).
o BALANCE Control.
Rotate the knob clockwise to emphasize right speaker sound (left speaker sound will be attenuated). When the control knob is turned counter clockwise, left speaker sound will be emphasized (right speaker sound will be attenuated).
12. CAT(FLDR) Button
Moves [CAT ] Button when Category Up
search operation.
o Category is moved Up from the category currently being received and Category Name becomes displayed.
o If the Enter Key is not pressed within 5 seconds, then the previous mode will be restored.
o If the Key is pressed while in the last Category, then the first category will become displayed and operation will be repeated.
o Corresponding category can be selected by pressing ENTER.
Moves [CAT ] Button when Category Down
search operation.
o Category is moved Down from the category currently being received and Category Name becomes displayed.
o If the Enter Key is not pressed within 5 seconds, then the previous mode will be restored.
o If the [CAT ] Key is pressed while in
the
first Category, then the last category will
become displayed and operation will be repeated.
o Corresponding category can be selected by pressing ENTER.
13. Preset Button
Push [1]~[6] buttons less than 0.8 seconds to play the channel saved in each button.
Push pre-set button for 0.8 seconds or longer to save current channel to the respective button with a beep.
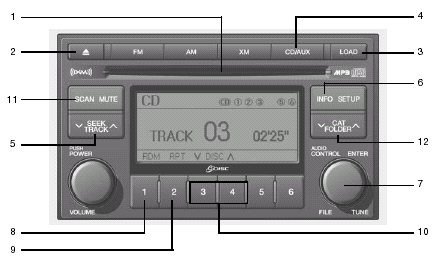
CDC (PA 760S) (If Installed)
1. CD Loading Slot
2. CD Eject Button
3. LOAD Button
4. CD/AUX Selection Button
5. Automatic Track Selection Button
6. INFO Button
7. TUNE/ENTER Button
8. RANDOM Play Button
9. REPEAT Button
10. DISC Selection Button
11. SCAN Play Button
12. FOLDER Button
1. CD Loading Slot
Please face printed side upward and gently push in. When the ignition switch is on ACC or ON and power is off, power is automatically turned on if the CD is loaded. This CDP supports both 8cm and 12 cm CDs. But if VCD, Data CD, MP3 CD are loaded, "Er-6" message will appear and CD will be ejected.
2. CD Eject Button
Push  button to eject the CD during CD
playback. This button is enabled when ignition
switch is off.
3. CD LOAD Button
Push [LOAD] button to load CDs to available CDC deck (from 1~6). Push [LOAD] button for more than 2 seconds to load into all available decks.
The last CD will play. 10 seconds idle status will disable loading process.
4. CD/AUX Selection Button
If the auxiliary device is connected, it turns to AUX MODE to play the sound from the auxiliary player.
If no auxiliary device is connected, it displays ""NO MEDIA"" for 5 seconds and returns to the previous mode."
5. Automatic Track Selection Button
o Push [SEEK ] button for less than
0.8
seconds to play from the beginning of current
song.
o Push [SEEK ] button for less than 0.8
seconds and press again within 1 seconds
to play the previous song.
o Push [SEEK ] button for 0.8 or longer
to
initiate reverse direction high speed sound
search of current song.
o Push [SEEK ] button for less than 0.8
seconds to play the next song.
o Push [SEEK ] button for 0.8 or longer
to
initiate high speed sound search of current
song.
6. INFO Button
Displays the information of the current CD
TRACK in the order of DISC TITLE DISC
ARTISTTRACK TITLE TRACK
ARTISTTOTAL TRACKPlay Screen DISC
TITLE···.(not displayed if the information is not
available on the DISC.)
7. TUNE/ENTER Button
Turn this button clockwise to display songs after current song.
Also, turn this button counterclockwise to display songs before current song.
To listen to the displayed song, press the button to skip to the song and play.
Pressing the changes the BASS, MIDR- ANGE, TREBLE, FADER and BALANCE TUNE mode.
The mode selected is shown on the display.
After selecting each mode, rotate the Audio control knob clockwise or counterclockwise.
o BASS Control.
To increase the BASS, rotate the knob clockwise, while to decrease the BASS, rotate the knob counterclockwise.
o MID-RANGE Control.
To increase the MID-RANGE, rotate the knob clockwise, while to decrease the MID-RANGE, rotate the knob counterclockwise.
o TREBLE Control.
To increase the TREBLE, rotate the knob clockwise, while to decrease the TREBLE, rotate the knob counterclockwise.
o FADER Control.
Turn the control knob clockwise to emph- asize rear speaker sound (front speaker sound will be attenuated). When the control knob is turned counterclockwise, front speaker sound will be emphasized (rear speaker sound will be attenuated).
o BALANCE Control.
Rotate the knob clockwise to emphasize right speaker sound (left speaker sound will be attenuated). When the control knob is turned counter clockwise, left speaker sound will be emphasized (right speaker sound will be attenuated).
8. RANDOM Play Button
Turns on/off the randomization of the play list of files in the currently played DISC.
To cancel the mode, press the key once again.
9. REPEAT Button
Repeats current song when the button is pressed for less than 0.8 seconds.
Repeats the entire DISC when the button is pressed for 0.8 seconds or longer.
10. DISC Selection Button
o [DISC ] Change Button
Changes disc to the previous disc.
o [DISC ] Change Button
Changes disc to the next disc.
11. SCAN Play Button
Plays first 10 seconds of each song in the DISC.
To cancel the mode, press the key once again.
12. FOLDER Button
Folder up/down operation.
o Folder is moved up or down from currently playing and folder name becomes displayed.
o Press enter key to play the selected folder.
o If the enter key is not pressed with in 5 seconds, then the previous folder name will be displayed again.
AUDIO FAULT CODE
If you see any error indication in the display while using the system in the CD or Tape mode, find the cause in the chart below. If you cannot clear the error indication, take the car to your Hyundai dealer.
| INDICATION | CAUSE | SOLUTION |
| Er2 | CD DECK MECHANICAL ERROR. (EJECT ERROR, LOADING ERROR) |
After resetting the audio system, push the eject button. If disc is not ejected, consult your Hyundai dealer. |
| Er3 | FOCUS ERROR. DATA READ ERROR |
Make sure the disc is not scratched or damaged. Press the eject button and pull out the disc. Then insert a normal CD disc. |
| Er6 | DISC ERROR | Check if the disc is inserted correctly in the CD
player. Make sure the disc is not scratched or damaged. |
| Er8 | TAPE DECK ERROR. TAPE EJECT ERROR |
After resetting the audio system, push the eject button. If tape does not eject, consult your Hyundai dealer. |
| HHH | TEMPERATURE IS TOO HIGH | Fault code will reset automatically when the temperature returns to normal. |
| no CD | NO DISC IN MAGAZINE. NO CD MAGAZINE IN THE AUTO CHANGER |
Insert disc in magazine or insert CD magazine in the auto changer. |
See also:
Anti-Lock Brake System
The Anti-Lock Brake System (ABS) is designed to prevent wheel lock-up during
sudden braking or on hazardous road surfaces. The ABS control module monitors the
wheel speed and controls the pressure ...
Defroster
CAUTION
To prevent damage to the conductors bonded to the inside surface of the rear
window, never use sharp instruments or window cleaners containing abrasives to clean
the window.
NOTICE
If y ...
Closing the hood
1. Before closing the hood, check the following:
• All filler caps in engine compartment must be correctly installed.
• Gloves, rags or any other combustible material must be removed from the engine ...