

Using a cellular phone or a twoway radio
When a cellular phone is used inside the vehicle, noise may be produced from the audio equipment. This does not mean that something is wrong with the audio equipment. In such a case, use the cellular phone at a place as far as possible from the audio equipment.
CAUTION
When using a communication system such a cellular phone or a radio set inside the vehicle, a separate external antenna must be fitted. When a cellular phone or a radio set is used with an internal antenna alone, it may interfere with the vehicle's electrical system and adversely affect safe operation of the vehicle.
WARNING Don't use a cellular phone when you are driving. You must stop at a safe place to use a cellular phone.
Care of disc (if equipped)
• If the temperature inside the car is too high, open the car windows for ventilation before using your car audio.
• It is illegal to copy and use MP3/WMA/ AAC/WAVE files without permission. Use CDs that are created only by lawful means.
• Do not apply volatile agents such as benzene and thinner, normal cleaners and magnetic sprays made for analogue disc onto CDs.
• To prevent the disc surface from getting damaged. Hold and carry CDs by the edges or the edges of the center hole only.
• Clean the disc surface with a piece of soft cloth before playback (wipe it from the center to the outside edge).
• Do not damage the disc surface or attach pieces of sticky tape or paper onto it.
• Make sure on undesirable matter other than CDs are inserted into the CD player (Do not insert more than one CD at a time).
• Keep CDs in their cases after use to protect them from scratches or dirt.
• Depending on the type of CD-R/CDRW CDs, certain CDs may not operate normally according to manufacturing companies or making and recording methods. In such circumstances, if you still continue to use those CDs, they may cause the malfunction of your car audio system.
NOTICE - Playing an Incompatible Copy-Protected Audio CD
Some copy protected CDs, which do not comply with the international audio CD standards (Red Book), may not play on your car audio. Please note that if you try to play copy protected CDs and the CD player does not perform correctly the CDs maybe defective, not the CD player.
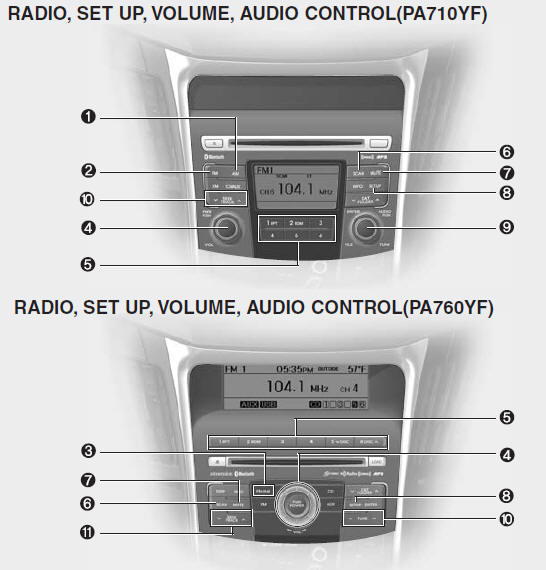
1. AM Selection Button
2. FM Selection Button
3. FM/AM Button
4. Power ON/OFF Button & Volume Control Knob
5. Preset Button
6. SCAN Button
7. MUTE Button
8. SETUP Button
9. Manual Channel Selector & Sound Quality Control Knob
10. Manual Channel Selector
11. Automatic Channel Selection Button
1. AM Selection Button
Pressing the [AM] button selects the AM band. AM Mode is displayed on the LCD.
2. FM Selection Button
Turns to FM mode and toggles FM1and FM2 when the button is pressed each time.
3. FM/AM Button
Turns to FM or AM mode, and toggles in the order of FM1➟FM2➟AM➟FM1... when the button is pressed each time.
4. Power ON/OFF Button & Volume Control Knob
Turns on/off the set when the IGNITION SWITCH is on ACC or ON. If the button is turned to the right, it increases the volume and left,decreases the volume.
• Adjusts the volume of the car audio system. Rotate clockwise to increase the volume or counterclockwise to decrease.
5. Preset Button
Push [1]~[6] buttons less than 0.8 second to play the channel saved in each button.Push Preset button for 0.8 second or longer to save current channel to the respective button with a beep.
6. SCAN Button
• When the button is pressed, it automatically scans the radio stations upwards.
• The SCAN feature steps through each station, starting from the initial station, for ten seconds.
• press the [SCAN] button again to stop the scan feature and to listen to the currently selected channel.
7. MUTE Button
Press the button to mute the sound.
8. SETUP Button
<PA710YF>
Press this button to turn to the XM option and the other adjustment mode. If no action is taken for 5 seconds after pressing the button, it will return to the play mode.(After entering SEPUP mode, move between items using the left, right and PUSH functions of the [TUNE] knob.)
The setup changes in the order of TEXT SCROLL➟AVC➟BT➟XM <PA760YF> In case of PA760YF, Using the [ FOLDER ] and [ENTER] button. The setup Change in the order of SOUND➟XM➟HD RADIO ➟ AVC ➟ CLOCK ➟SCROLL➟PHONE➟RETURN
• SCROLL <TEXT SCROLL: PA710YF> This funtion is used to display characters longer than the LCD text display and can be turned ON/OFF through the sound quality control knob. (For PA760YF, Press the [ FOLDER ] button.)
• AVC This funtion automatically adjusts the volume level according to the speed of the vehicle and can be turned ON/OFF through the sound quality control knob. (For PA760YF, Press the [ FOLDER ] button.)
• SOUND <PA760YF> Pressing the [ FOLDER ] button to select the sound the following order : Sound Setup, Variable EQ Select the Sound Setup and press [ENTER] the button to set. Pressing the [ENTER] button to adjust the Sound Setup the following order : BASS, MIDDLE, TREBLE, FADER, BALANCE. Select the BASS and press the [ FOLDER ] button to set. Use the same method to adjust MIDDLE, TREBLE, FADER, BALANCE and press the button to [ENTER] complete and exit from Sound Setup adjustment mode.
• Variable EQ<PA760YF> Pressing the [ FOLDER ] button to Select the sound the following order : Sound Setup, Variable EQ Select the Variable EQ and press the [ENTER] button to set. Pressing the [ FOLDER ] button to select the Variable EQ the following order : Normal, Powerful, Concert Select and press the [ENTER] button to complete and exit from Variable EQ set up mode.
• XM It will be able to change the XM display. ex) Display by category/channel or artist/song title. Select the XM Display through the [ FOLDER ] button(for PA710YF, Turn the control knob), and press the [ENTER] button(for PA710YF, press [TUNE] knob) to complete and exit XM setup mode.
• HD RADIO This funtion is used to enable FM/AM HD RADIO receptions, and detail display. Press the [ FOLDER ] button to select the HD RADIO setup the following order : HD RADIO FM, HD RADIO AM, Details. Press the [ENTER] button to the HD RADIO setup and can be turned ON/OFF through the [ FOLDER ] button. Press the [ENTER] button to complete and exit HD RADIO setup mode.
• CLOCK <PA760YF> Pressing the [ FOLDER ] button to adjust the clock in the following order: CLOCK SET, TIME FORMAT, RETURN. Adjust the CLOCK SET and press [ENTER] button to set. Use the same method to adjust TIME FORMAT and press the [ENTER] button to complete and exit and from clock adjustment mode.
9. Manual Channel Selector & Sound Quality Control Knob
Turn this control while listening to a radio channel to manually adjust frequency. Turn clockwise to increase frequency and counterclockwise to reduce frequency. Pressing the button changes the BASS, MIDDLE, TREBLE, FADER and BALANCE TUNE mode.
The mode selected is shown on the display. After selecting each mode, rotate the Audio control knob clockwise or counterclockwise.
BASS Control
To increase the BASS, rotate the knob clockwise, while to decrease the BASS, rotate the knob counterclockwise.
MIDDLE Control
To increase the MIDDLE, rotate the knob clockwise, while to decrease the MIDDLE, rotate the knob counterclockwise.
TREBLE Control
To increase the TREBLE, rotate the knob clockwise, while to decrease the TREBLE, rotate the knob counterclockwise.
FADER Control
Turn the control knob clockwise to emphasize rear speaker sound(front speaker sound will be attenuated). When the control knob is turned counterclockwise, front speaker sound will be emphasized(rear speaker sound will be attenuated).
BALANCE Control
Rotate the knob clockwise to emphasize right speaker sound(left speaker sound will be attenuated).
When the control knob is turned counter clockwise, left speaker sound will be emphasized(right speaker sound will be attenuated).
10. Manual Channel Selector Press the [ FOLDER ] button while listening to a radio channel to manually adjust frequency.
11. Automatic Channel Selection Button
• When the [SEEK  ] button is pressed,
it increases the band frequency to automatically select channel. Stops at the previous
frequency if no channel is found.
• When the [TRACK  ] button is pressed,
it reduces the band frequency to automatically select channel. Stops at the previous
frequency if no channel is found.
See also:
Warranties for Your Hyundai Vehicle
Please consult your Owner's Handbook & Warranty Information booklet for your
vehicle's specific warranty coverage. ...
Changing the air cleaner filter
To change the filter, unsnap the clips around the
cover. When this is done, the cover can be lifted
off, the old filter removed and the new filter put
in its place. Genuine Hyundai Replacement
P ...
Checking the brakes
CAUTION:
Because brakes are essential to the safe
operation of the car, it is suggested that
they be checked and inspected by your
Hyundai dealer. The brakes should be
checked and inspected for w ...