

Starting
Starting
WARNING:
Never run the engine in a closed or poorly
ventilated area any longer than is needed to
move your car in or out of the area. The
carbon monoxide gas emitted is odorless
and can cause serious injury or death.
Normal Conditions:
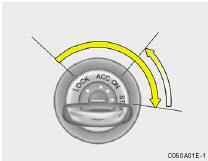
The Starting Procedure: 1. Insert key, and fasten the seat belt.
2. Depress the clutch pedal fully and place the gearshift lever (manual transaxle) in neutral or the selector lever (automatic transaxle) in "P" (park) position.
3. After turning the ignition key to the "ON" position, make certain all warning lights and gauges are functioning properly before starting the engine.
WARNING:
Be sure that the clutch is fully depressed
when starting a manual transaxle vehicle.
Your manual transaxle equipped vehicle will not start unless the clutch pedal is fully depressed.
4. Turn the ignition key to the "START" position and release it when the engine starts.
After the engine has started, allow the engine to run for 10 to 20 seconds prior to placing the vehicle in gear.
The starter should not be operated for more than 15 seconds at a time. Wait 15-30 seconds between starting attempts to protect the starter from overheating.
WARNING:
Always fully depress the brake pedal before
and while shifting out of the "P" Park position
into another position to avoid inadvertent
motion of the vehicle which could
injure persons in or around the car.
See also:
Keys
For greater convenience, the same key operates
all the locks in your Hyundai. However,
because the doors can be locked without a key,
carrying a spare key is recommended in case
you accidentally ...
Seat belts
SEAT BELT PRECAUTIONS
WARNING:
All occupants of the vehicle must wear their
seat belts at all times. Seat belts and child
restraints reduce the risk of serious or fatal
injuries for all occupants ...
High Mounted Stop Light
1. Open the trunk lid.
2. Remove the socket from the housing by turning the socket counterclockwise
until the tabs on the socket align with the slots on the housing.
3. Remove the bulb from th ...