

RADIO, SET UP, VOLUME CONTROL (PA710) (If Installed)
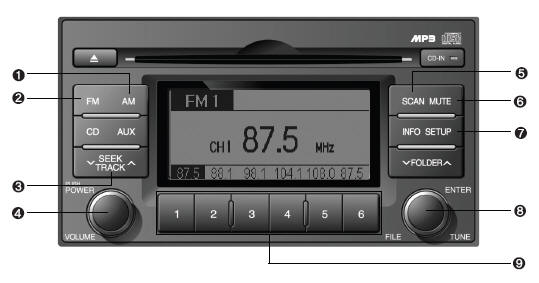
1. AM Selection Button
2. FM Selection Button
3. Automatic Channel Selection Button
4. Power ON/OFF & Volume Control Button
5. SCAN Button
6. MUTE Button
7. SETUP Button
8. TUNE/ENTER Button
9. PRESET Button
1. AM Selection Button
Pressing the [AM] button selects the AM band. AM Mode is displayed on the LCD.
2. FM Selection Button
Turns to FM mode and toggles FM1 and FM2 when the button is pressed each time.
3. Automatic Channel Selection Button
o When the [SEEK ] button is pressed,
it reduces the band frequency by 200khz to automatically select channel. Stops at
the previous frequency if no channel is found.
o When the [SEEK ] button is pressed,
it increases the band frequency by 50khz to automatically select channel. Stops
at the previous frequency if no channel is found.
4. Power ON/OFF & Volume Control Button
Turns on/off the set when the IGNITION SWITCH is on ACC or ON. If the button is turned to the right, it increases the volume and left, decreases the volume.
5. SCAN Button
If this button is pressed, the frequencies will become increased and receive the corresponding broadcasts.
This function will play the frequencies for 10 seconds each and find other broadcasts as the frequency increases.
Press the button again when desiring to continue listening to the currently playing broadcast.
6. MUTE Button
Press to temporarily cut off the Sound.
7. SETUP Button
Press this button to turn to the SCROLL and P.BASS adjustment mode.
If no action is taken for 5 seconds after pressing the button, it will return to the play mode.(After entering SETUP mode, move between items using the left, right and PUSH functions of the TUNE button.) The setup Items changes from SCROLL <->P.BASS.
8. TUNE/ENTER Button
Turn this button clockwise one notch to increase frequency from current frequency. Turn this button counterclockwise by one notch to decrease frequency from current frequency.
The frequency cahnges by 0.2Mhz in FM MODE and 9Khz in AM MODE. Press this button while holding SETUP button to activate / inactivate the item to. Select SETUP item using left and right function of the Tune button.
9. PRESET Button
Push [1]~[6] buttons less than 0.8 second to play the channel saved in each button. Push PRESET button for 0.8 second or longer to save current channel to the respective button with a beep.
CAUTION:
o Do not place beverages close to the audio system. The audio system mechanism may be damaged if you spill them.
o Do not strike or allow anything to impact the audio system, damage to the system mechanisms could occur.
See also:
FILLING THE WASHER RESERVOIR
A good quality washer fluid should be used to fill the washer reservoir. The
fluid level should be checked more frequently during inclement weather or whenever
the washer system is in more frequ ...
MICRO ANTENNA
Your car uses the micro antenna to receive AM, FM and Satellite Radio broadcast
signals. This antenna is removable.
CAUTION:
Before entering a place with a low height clearance or a car wash, re ...
Owner maintenance schedule
When you stop for fuel:
• Check the engine oil level.
• Check coolant level in coolant reservoir.
• Check the windshield washer fluid level.
• Look for low or under-inflated tires.
WARNING
Be ca ...